 Click
here for printable version of this User Guide Click
here for printable version of this User Guide
User Guide
Get Started!
New in Version 5
Configuring Popular Player Programs
Setting up Your Firewall
Starting a Recording Session
Stopping a Recording Session
Tagging and Editing Track Information
Splitting Tracks Manually
Sorting the Track List
Deleting Tracks
Configuring Replay Music (Settings)
Creating CDs
Recording LP's or cassette tapes
Get Started!
Replay Music is a revolutionary new way to capture streaming music from the
Internet or any external source into MP3 files or CD's. And it's really easy
to use, too.
For best results, we suggest you use one of the following high-quality streaming
music services:
New in Version 5
While similar in appearance to Replay Music 4, there is a lot of new power under the hood. Here's the highlights:
- Better tagging. Replay Music 5 identifies songs better and faster than Replay Music 4. Using a new database from Rovi, Replay Music is far more accurate. Plus, only about 90 seconds of a song are needed to get an accurate tag.
- Replay Music 5 now is able to tag songs in any language supported by Microsoft using the language's character set. For example if the song has a Japanese title it will tag it with Japanese characters.
- Updated the conversion process to convert quicker with less errors.
- The transferring process to the Windows Media Player library has been updated.
Configuring Popular Player Programs
Some player programs may need to be configured to work optimally with Replay
Music. Here's how to configure the popular ones:
Rhapsody:
For the best track recognition when recording from Rhapsody:
- Turn off Rhapsody's equalizer. Click on Tools, Equalizer
and set it to the OFF state.
- Keep Rhapsody's main volume level to at least mid-range.
As with all player programs, be sure to open Replay Music PRIOR to opening
Rhapsody.
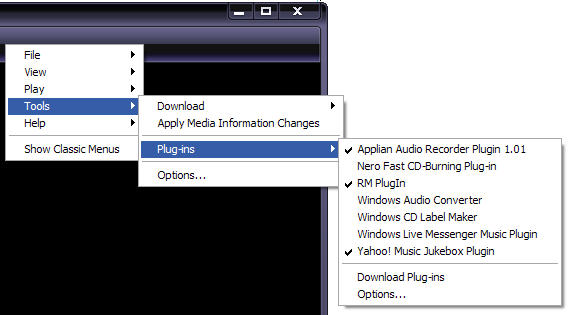
Napster and all Other Windows Media based services:
- If you're recording from a Windows Media source (like Launchcast or Napster), make sure that the Applian Audio Recorder Plug-in is enabled in Windows Media Player:
Please note: Replay AV and the Freecorder Toolbar use the same specialized audio driver that Replay Music uses. Please make sure that these programs are closed when using Replay Music.
Setting up Your Firewall
When you use Replay Music, it needs access to the Web to look up the song information.
Often times, your firewall may not allow Replay Music access. Here's how to
configure two of the most popular firewall solutions, Windows Firewall and Zone
Alarm.
Windows Firewall:
- Open Windows Firewall. Click Start, Settings, Control Panel, then
Network Connections. Next, choose Change Windows Firewall Settings.
Windows Firewall appears.
- Click the Exceptions tab. The screen below appears:

- Click Add Program, and then select Replay Music from the list.
Your will see this screen:

- Click OK. Replay Music will now be able to access the Web to lookup
song information.
For Zone Alarm:
- Open Zone Alarm, and click the program Control Tab.
- Locate Replay Music. If Replay Music is blocked, you'll see red X's next
to it as shown here:

- Click each X, and select Allow. When you're done, your screen should look
like this:

Starting a Recording Session
IMPORTANT: When recording, be sure to open Replay Music first, THEN
open the music player program or browser you're using. If recording from a website, be sure to see number 14 below.
Here's how Replay Music appears when you open it:
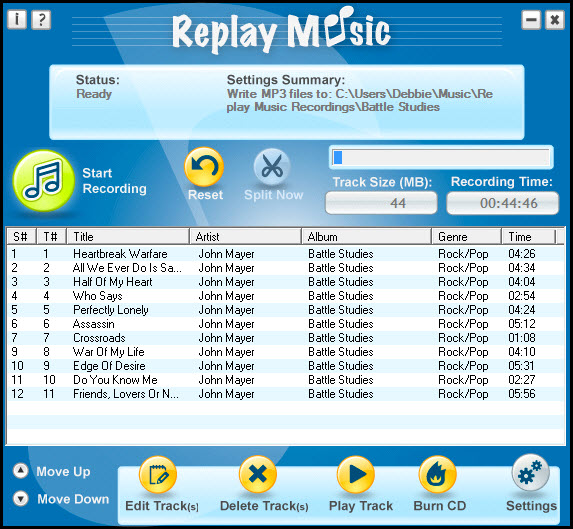
To start a recording session:
- Open Replay Music by clicking the Replay Music icon
 on your desktop.
- Open your browser or music player program.
- In Replay Music , click the Start Recording button. The Start Recording
Session dialog appears:

- Optionally, enter a name for the Artist and Album.
This is used if Replay Music can't determine the artist or album name.
- If you select the "Always tag with Artist/Album name
above" option, Replay Music
will use whatever you have entered above as the Artist and Album for that
entire recording session. This overrides Replay Music's Album/Artist lookup.
- Enter a Default Genre. If Replay Music cannot determine a genre,
then this one is used.
- Check Always tag with Genre name if you want to override Replay
Music's genre lookup.
- You can customize how files are saved into subfolders using the Directory
Format.
- \%a will save each file into a folder with the name of the Album.
- \%A will save each file into a folder with the name of the Artist.
- \%G will save each file into a folder with the name of the Genre.
You can also combine tags -- for example, %A\%a will create an
artist directory with the artist's albums as a subdirectory.
- If you want to automatically stop recording after a certain time, enter
a value next to End recording after. Otherwise, just leave it blank.
- Add Tracks to Windows Media Player: If you want your recorded
tracks to be added to your Windows Media Player music library, check this
option. Tracks are added after the recording session ends.
- Add Tracks to iTunes: If you want your recorded tracks to be added
to iTunes automatically (for syncing to your iPod or iPhone), check this option. Tracks
are added after the recording session ends.
- Open a Recording Session: Selecting this option will prompt you to open a saved recording session to edit track information or to continue recording.
- Save Recording Session:Selecting this option will prompt you to save your recording session to a file so that you can open it again later to edit track information or to continue recording.
- If you will be recording from a website, click the Record From Website button to open your browser. Then browse to the site that you will be recording from.
- Click OK. The recording session starts.
To ensure Replay Music is recording, look for the VU Meter graph moving rapidly
on the main screen. This lets you know that Replay Music can "hear" the
audio to record. If you do not see movement in the VU Meter, then Replay Music
is not detecting any audio. Make sure that you always open Replay Music PRIOR
to starting the application that you will be recording from.
After each song ends, Replay Music determines the artist and track name, and
displays those names in the recorded songs list.
Stopping a Recording Session
After you're done recording, click the Stop Recording button. This ends
the recording session.
If you've specified that a CD is to be created, or if you want to add songs
into iTunes, then those operations will occur at this time.
Tagging and Editing Track Information
Occassionally a track will tag a track as unrecognized. However, you can give Replay Music another chance to tag unrecognized tracks.
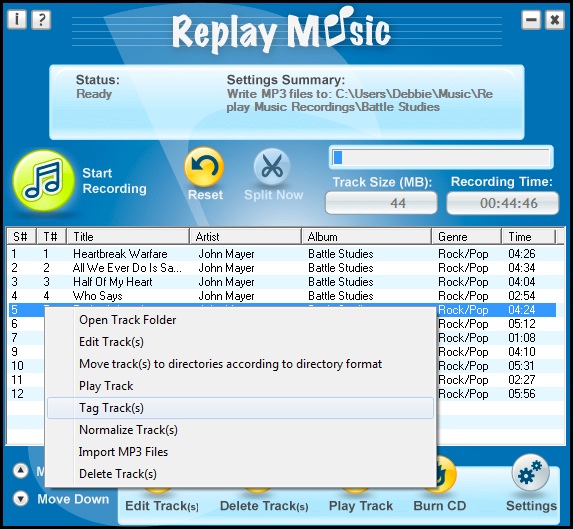
To query the music database and attempt to tag a track again:
- If the track was from a previous recording session, Replay Music can import it into the track list. Right-click on the main window and select import mp3 files. Or, you can open a previously saved session from the start recording button and select open recording session then click ok.
- Once the track that you want to tag is listed in the main window, right-click on it and select Tag Track. If the track is recognizable Replay Music will tag it. Keep in mind that newly released albums may not yet be in the music database.
You can edit information that is saved along with
each recorded song. This allows you greater control over how songs are labeled,
or allows you to properly tag a song that is unrecognized by Replay Music. You
can edit tracks one at a time, or several at once.
To manually edit track information for a single song:
- Click the song to edit.
- Click Edit Track(s). Or right-click on the track to edit and select
"edit track" from the menu options.
- The
Edit Track dialog appears:

- Change the title, artist or album, track number or genre fields as you like.
- Click Update Art to check the music database for album art. If none is found you can choose Load Art to attach your own.
- Click OK and the song data is now changed in the MP3 file.
To manually edit multiple tracks:
- Highlight the tracks to edit.
- Click Edit Track(s). The Edit Multiple Tracks dialog appears:

- Change the Artist, Album or Genre tag. If you don't want to change a tag,
leave it blank.
- Click OK when finished.
To move tracks: Right click on the track to move and select "Move
Track(s) to directories according to directory format". This
allows you to move
already recorded songs in the track list to the same folder selected in the "Directory
Format" text
box found in the "Start
Recording Session" dialog box. This is good for organizing songs.
Splitting Tracks Manually
Sometimes when recording from radio or live footage, there are no cues for
the end of a track, and you may want to split tracks manually. You can do this
by clicking the Split button while recording. The split button looks like this:

Sorting the Track List
During or after a recording session, you can sort the track list by artist,
album or genre as follows:
- Click S# to sort songs in the sequence which they were recorded.
- Click T# to sort by album track number.
- Click Title to sort by song title.
- Click Artist to sort by artist.
- Click Album to sort by album name.
- Click Genre to sort by genre.
Deleting Tracks
After recording, you can delete tracks you do not wish to save.
You can delete tracks using the "delete" button, or by right-clicking on the
track and select "delete" from the menu options.
To delete tracks:
- Select the track or tracks to delete.
- Click the Delete Track(s) button
or
- Right-click on the track to delete.
- Select "delete" from the menu options.
Configuring Replay Music (Settings)
Replay Music lets you configure some parameters for optimizing the recording
experience. Start by clicking the Settings button, and the Settings dialog
appears.
Input

- Pick a folder to hold recorded files: This is the folder where your
MP3 recordings are saved. Actually, they are saved in a subfolder under this
folder, with the same name as the album name. So, if this setting is "D:\Music",
and the album you're recording is named "Eagles", then songs are
saved in "D:\Eagles".
- Input Source: For most streaming recordings, use Audio Driver as the
input source. Windows 7 and Vista users who experience skipping or have trouble picking up an audio signal should select the Windows Audio Driver option (only available to Windows 7 and Vista users)..
- Tag with Template: Replay Music does a great job of automatically tagging tracks for you, but sometimes you may want to take the tag data directly from the browser. Some online music sites will list the track information in the browser's title bar for each individual track that is currently playing. If you'd like Replay Music to get its track information directly from the browser's title area, enable this setting along with the format that the site uses. For example, Last.fm prints the artist and song title information in the browser title area like this %A-%T-Last.fm. As always, %A=Artist, %T=Title of song, %a=Album. This will work with any website that lists the track tag information in the browser title bar.
- Stop Recording After Idle: If you're doing an unattended recording
session, you can have Replay Music automatically stop recording once a certain
amount of idle time is detected. Set this to zero to disable this feature.
Splitting Tracks

In general, the default settings for these parameters will work with most of
the popular Internet Music sources. Only change these if your songs are not
being split properly.
- Automatically Split Tracks: Enables automatic track splitting. If you uncheck this,
then no track splits take place while recording.
- Ignore audio close split: Use this option if tracks always split prematurely at the same place
- Minimum milliseconds of silence between tracks: When Replay Music
records, it splits songs into individual tracks, primarily based upon detecting
silence between each track. If tracks are not being split properly, adjust
this setting. (Note: 1000 milliseconds = 1 second.)
- Do not record or split track if less than __ second(s): Occasionally
when recording, you may get partial tracks or unwanted interludes. This setting
lets you choose to eliminate tracks under a certain length you decide.
- Volume Level Cut-off: When Replay Music determines silence, it uses
a minimum volume threshold for deciding what "silence" is. For example,
if you're recording from a vinyl LP, there may be some detectable background
noise. You can increase this value if recordings are not being split properly,
if you think that some background noise is occurring.
Here are our suggested defaults:
Minimum Milliseconds: 500
Do Not Record: 15 seconds
Volume Level Cutoff: 500 - 900 range.
Proxy

Replay Music needs to access the Web to determine the artist and track title
for each song. If you connect to the Web using a proxy server (most connections
DON'T), then set the Proxy Address and Port here.
Output Options

Replay Music can create MP3 files, or automatically burn CDs for you.
- File name format: This setting allows you to customize how your files
are named. The symbols used for formatting are:
- %T = Track name
- %A = Artist name
- %a = Album
- %G = Genre
- %t = Track number
- %s = Sequence number
The default is %T-%A which means the track name will come first, then "-",
then the artist name.
- Track & Sequence number File name digits: Setting this option to
"2" will add leading zeros to track number in the file name
for better file sorting.
- Recording Volume: Move the slider to increase or decrease how loud songs are recorded. If your recordings are always faint or too loud, this will help you adjust the volume.
- Normalize: Select this option to obtain consistent volume in your recordings. You can also import files from your music library into Replay Music and normalize them as well.
- Automatic Tagging: You can turn off tag lookups for artist, title, album and genre information when this setting
is unchecked.
- Record to MP3s: Makes individual MP3 files from each song. If this
is selected, you can choose the bit rate for the MP3 file. Note that saving
to a bit rate higher than the original recording has no effect on the quality.
Normally, 128 Kbps or 196 Kbps is sufficient for excellent quality.
- Record to WAV: Makes individual WAV files from each song.
- Burn
to MP3 CD: After
the recording session ends, all your recorded tracks are burned to an MP3
DATA CD. (You will need a CD Player that can read MP3 CDs to play this.)
- Burn to Audio CD: After the recording session ends, all your recorded
tracks are burned to an Audio CD. These CDs hold a maximum of 74 minutes
of audio, and will work on virtually all CD players. (Note: when burning
audio CDs for use on older CDs players, be sure to use CD-R discs, not CD-RW.
CD-RW discs may not work in older CD payers.)
- When reach 700 Mb Max: This ends the recording session, and burns
the MP3 DATA CD once the total size of recordings becomes 700 Mb, the maximum
capacity of an MP3 DATA CD.
- When reach 80 minutes max: When burning audio CDs, the CD creation
process will start once 80 minutes of songs have been recorded.
- Kbps: Select the bit rate of the final file. Generally 128 Kbps
gives great quality, but you can go up to 320 Kbps. Note that recording a
128 Kbps stream and outputting it to 320 Kbps won't give you any better sound
quality.
- CBR or VBR: CBR stands for Constant bitrate and VBR stands
for Variable Bitrate. CBR is the older encoding method, so all MP3 players
recognize this encoding method and a player can easily calculate the length
of the MP3 recorded with this method. VBR is a newer encoding method so the
recorded files will usually be smaller compared to CBR, but some players
do not recognize this method and may have a hard time measuring
the length of the MP3 recorded.
Creating CDs
Replay Music can burn CDs automatically from your recordings. Both Audio CDs
and MP3 DATA CDs can be created. Plus, you can make CDs on-the-fly, or pick
tracks to place on a CD after a recording session has ended.
To make a CD:
- Click Settings, and choose one of the CD output options: Burn
to MP3 CD or Burn to Audio CD.
- Click Start Recording to start your recording session.
- Click Stop Recording when finished recording.
- Follow the instructions which appear for burning all recorded tracks automatically
or just selected tracks.
- The CD will be created.
Recording LP's or Cassette Tapes
You can also use Replay Music to record LP's or cassette tapes as MP3 files
or CDs. Here's how:
- Hook an AMPLIFIER output attached to your audio tape recorder to the line-in
or mic port on your PC. (Hooking up the turntable or tape recorder directly
to the PC won't produce any sound.)
- In Replay Music's Settings, change the Input Source to Line-In
or Microphone (depending upon which port you connected to in step 1). Click
OK when finished.
- Click Record, and play your tape or LP.
Legal Notices
Song recognition uses technology licensed from Rovi Corporation and AMG. The license agreement is here.
|
|